TLDR:
Building a Splunk Test instance is really useful, helps protect against prod outages and very performant hardware is now available for a fraction of the price it used to be; if you're willing to deal with some tech challenges!
Splunk Test instance
Many of our clients rely on Splunk as their production SIEM tool to monitor, detect and respond to cyber security events. The production system is therefore critically important and ensuring that no logs are lost or un-necessary downtime experienced, it is really important to have a test instance that accurately maps the prod environment and the apps, sourcetype's and KO's (Knowledge Objects) in place.
This does not mean you have to duplicate your hardware exactly or disk and licensing costs but they (test environments) do offer a great opportunity to avoid problems if correctly planned and considered. As a certified Splunk consultant, continuous personal development, practice and ongoing training is equally necessary and valuable.
Since 2020 I have relied upon an S1 (Splunk Validated Architecture, standalone server) as my training environment based upon an Intel NUC i5 with 4x CPU cores, 16GB RAM and M2 NVME solid state storage. I run Ubuntu 22.04 and Splunk 9.1.x. It has served me well as a platform and I couple this with a similar spec Syslog server with a UF (Universal Forwarder) to accurately simulate data onboarding. Whilst it has been a good platform it is under-spec'd and Splunk recommend a minimum of 16 cores for this type of standalone hardware. It is also not up to the task of running premium apps such as Enterprise Security or SOAR both of which I have use case testing for.
Moore's Law
Since my 2020 purchase, CPU's have continued their upwards power trajectory and inverse pricing, there are now some quite incredible CPU's available that in the past would have been only affordable as high end servers. AMD has also become a significant and viable challenger to Intel in some use cases, and their extreme hyper-threading capability is very useful in some industries. In Splunk 7.x docs Splunk used to specify an Intel CPU specifically, now it is a more generic x86 (64-bit) CPU architecture (URL). This is brilliant for end user choice and building high performance systems without single vendor tie.
What hardware to choose?
I had a few options open to me:
- 1.Custom hardware build, with appropriate CPU (Xeon, Intel, AMD)
- 2.Barebones NUC type hardware (bring RAM and Disk)
- 3.Off the shelf hardware e.g. Dell PowerEdge
Option 1: During my university days in the early noughties building a custom PC with LED's and water cooling etc. was good fun as a hobbyist past-time, it isn't for the faint hearted though and there were always issues with compatibility, drivers and at that time stability. Whilst potentially the most performant option, this isn't a scalable solution and not one which I could recommend to clients who may wish to clone our Test platform architecture. I discounted this option, leave custom builds for the gaming community, whom by the way we have a lot to be thankful for in modern hardware capabilities particularly GPU's.
Option 2: is to use a NUC or Next Unit of Compute, Intel's commercial offering of an advanced single board computer where all you have to do is bring RAM and Disk (typically), there are a bunch of different offerings and other vendors also offer this style of hardware now. This is a great option and having worked on numerous NUC's I know that they're stable, have Linux hardware drivers (for the most part) and allow you to get on with the platform build without getting bogged down in hardware challenges; however more on this later.
Option 3: is to go to a reputable vendor and purchase a commercial-off-the-shelf (COTS) platform. This sounds sensible but the reality is the hardware on offer is stale and often last generation and overpriced. For example at the time of writing a Dell PowerEdge small Tower Server will set you back £3,300 for single Xeon Silver CPU at 2.8Ghz with a paltry 16GB RAM and a mechanical SAS hard drive; this is very much tired hardware IMHO in 2023 and I bet the IOPS (input, output speed of the disk is miserable) probably around 600-800 IOPS.
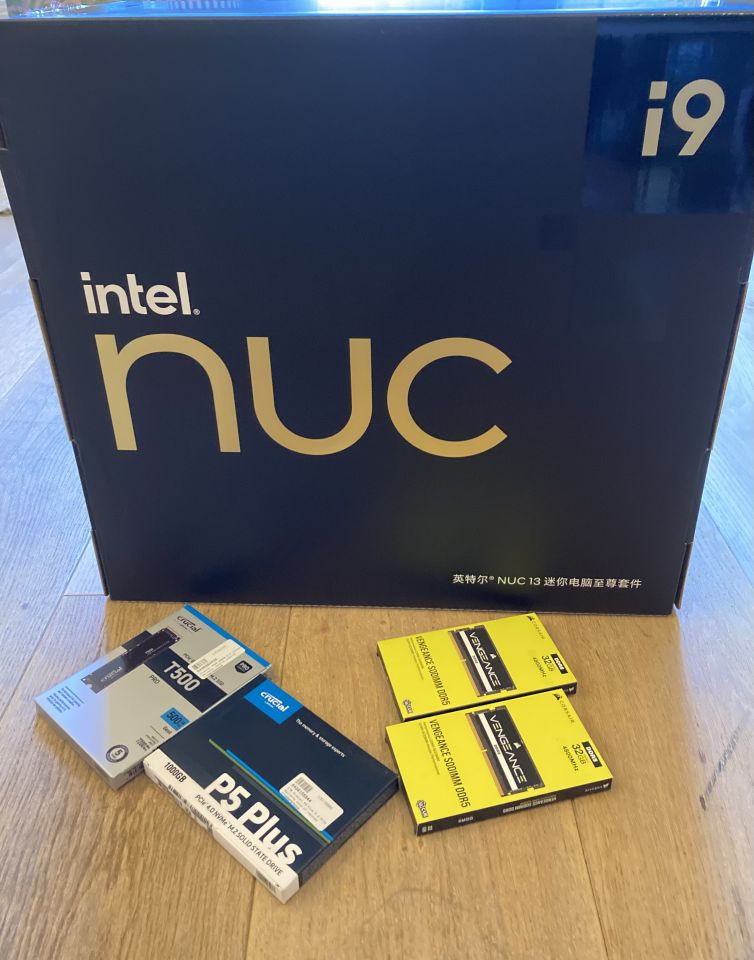
Option 2 it was, and I selected the Intel NUC 13 i9 with 24 cores (NUC13RNGi9, vendor URL), note it has recently been discontinued from sale as a product and can be snapped up for an absolute bargain.
Linux OR Linux
Ok, you can run Windows for Splunk Enterprise but it is less performant (especially in the DS role) where it has 1/5th of the capability, but I want to train on apps such as Splunk Enterprise Security which does not currently support Windows OS at all. So the choice is Linux OR Linux (a great choice to have) and my preferred distro at present is Ubuntu Server 22.04; there are many respected variances and the *nix community is vibrant, helpful and enjoyable to be a part of. Most clients running Splunk in production run on RHEL or in the past CentOS, a replacement for is still relatively unclear.
Putting it all together
Great so NUC ordered, with 64GB of RAM in 2x32GB 4800Ghz DDR5 format from Corsair and two blisteringly fast NVME drives. The idea with storage is that you have a smaller, maximum speed OS disk and then a larger, slightly less performant indexes storage disk. In this case both have a whopping 7000MB/s which is faster than anything server hardware can offer in 2.5inch format.
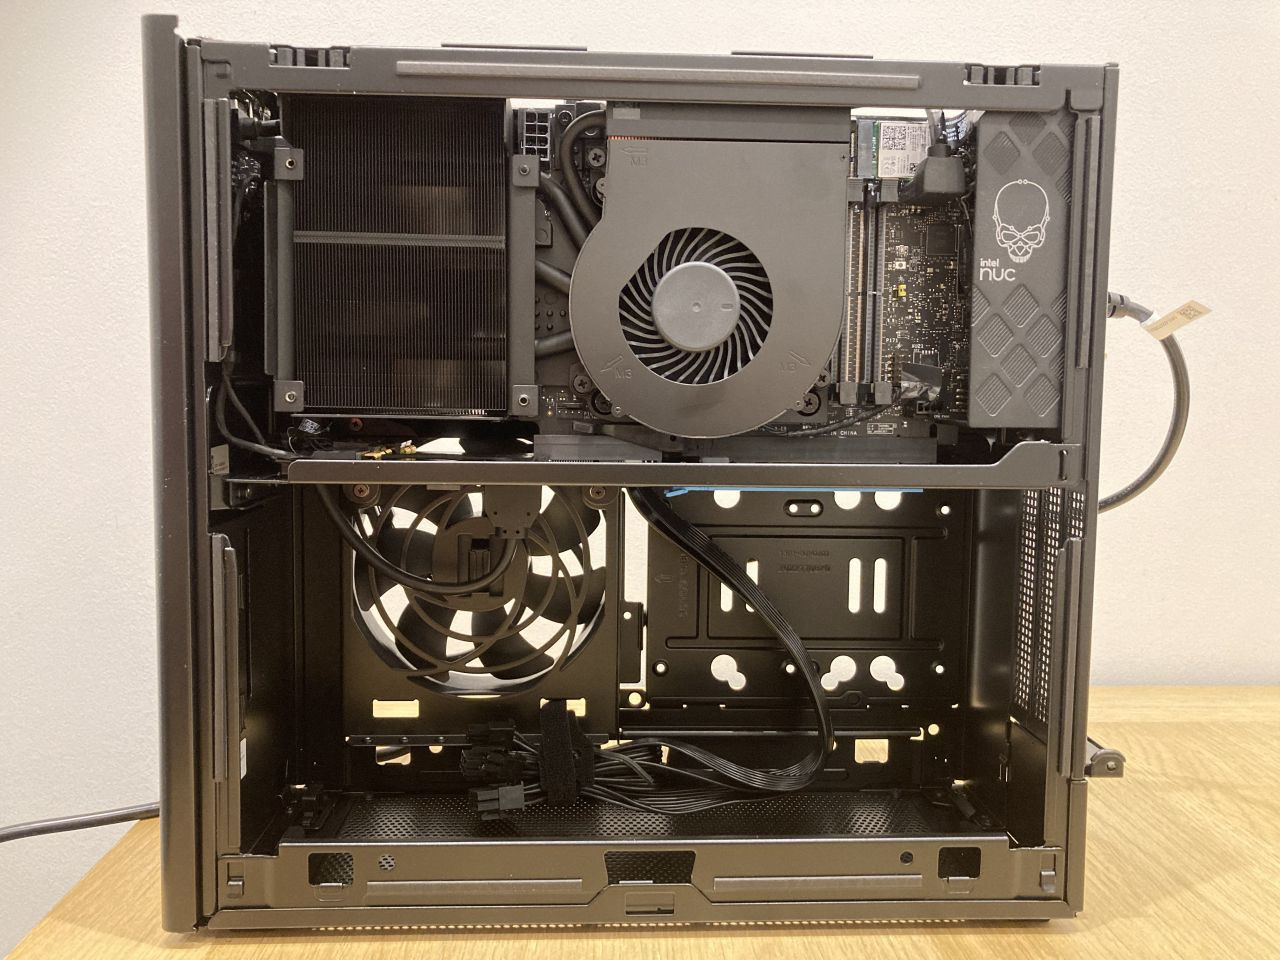
The kit arrived less than 24hrs later and I've put together a video of the process to show how easy it was to do, however nothing in life is quite that straight-forward is it.
That wasn't supposed to happen!
I carefully inserted the RAM and storage observing anti-static precautions and powered it up waiting for a roar of the platform bursting into life. Nothing, absolutely nothing at all, perhaps a small twitch in the CPU cooling fan but that was it. Ok, start small and work it through, I reduced it to a single RAM module and no storage and built it back up. Still nothing, ok lets read the docs again and slowly, it was all rather frustrating for such a simple build and all looked fine, RAM pushed in fully.
Technical Product Specifications for Intel® NUC Products
Tested Peripherals for Intel® NUC Products
On checking the compatibility docs there were a few things that jumped out. Firstly that only a small number of select vendors are listed as Intel labs verified, this shouldn't be a problem but it does create some doubt. The next issue is that the docs explained that the maximum SO-DIMM density was 4, 8 and 16 GB memory technology with SPD support. This was really misleading as the maximum support for the NUC is 64GB, so how can you reach this in two slots if the maximum density is 16GB per stick? A support ticket later and a little bit of frustration and it was clarified to me that this means per side but not stated in the docs! So in theory the RAM I had ordered should be ok despite not being validated.
Sadly I had to RMA it and switch to Crucial branded RAM, which is fine and a reputable brand with equal performance stats, but it was just annoying that the docs are not clearer and that there is a problem in 2023 with relatively commodity hardware. The original vendor was good about the RMA and they were very well accustomed to Intel's compatibility page apparently!
Fingers crossed...
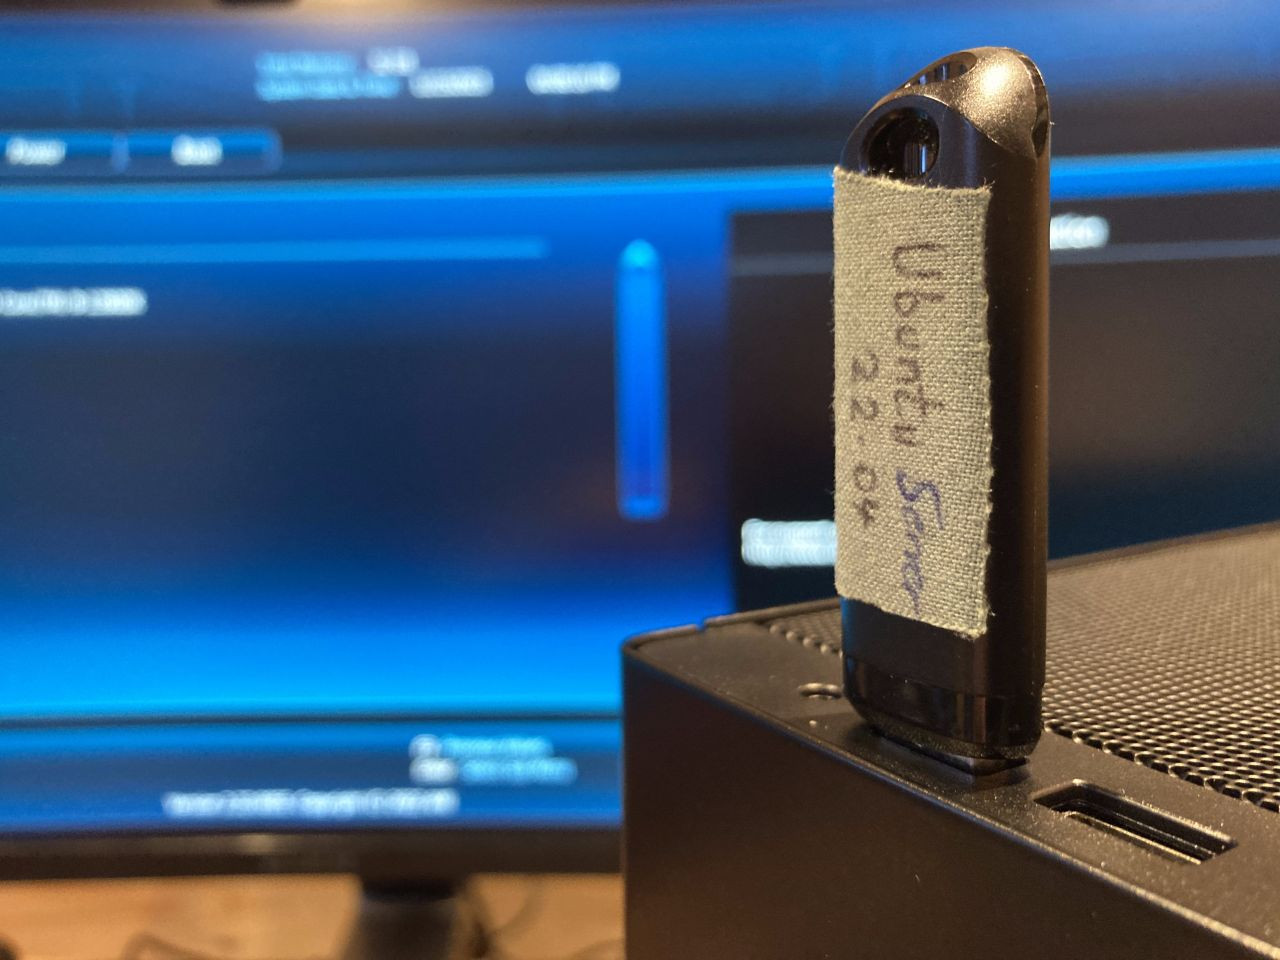
With a barely perceptible sound the platform started, I wasn't sure the NUC had in-fact powered up and it was only the monitor output to the UEFI setup that alerted me that all was now well. I created a bootable Ubuntu USB using the following sequence:
- Browsed to https://ubuntu.com/download/server
- Downloaded: https://releases.ubuntu.com/22.04.3/ubuntu-22.04.3-live-server-amd64.iso
- Verified the checksum (critical for security, integrity check)
# Creating a Bootable Ubuntu Disk:

<pre>
# identify the USB disk
sudo fdisk -l

# verify the Ubuntu image name
ls

~/Downloads$ sudo dd bs=4M if=ubuntu-22.04.3-live-server-amd64.iso of=/dev/sdb1 status=progress oflag=sync
2130706432 bytes (2.1 GB, 2.0 GiB) copied, 350 s, 6.1 MB/s
508+1 records in
508+1 records out
2133391360 bytes (2.1 GB, 2.0 GiB) copied, 349.935 s, 6.1 MB/s
</pre>
Ubuntu Build
With the platform live and at the command prompt I set about the very basics of system administration before proceeding with a standard professional Splunk install. This is a recommended initial start, you also need to consider UFW (firewall config) and hardening to CIS benchmarks depending on your environment.
# Update the platform
<pre>
sudo apt-get update
sudo apt-get upgrade
sudo apt-get install net-tools
</pre>

# Setup 'root' user
- Save new password to password manager
<pre>
  sudo passwd root
  # Enter password
  # Re-enter password
  su -
  exit
</pre>

# IP Setup
- [how to](https://www.linuxtechi.com/static-ip-address-on-ubuntu-server/)
<pre>
  cd /etc/netplan
  # Create a backup before starting
  sudo cp 00-installer-config.yaml 00-installer-config.yaml.bak

  sudo nano 00-installer-config.yaml

  ### Detail end result of netplan
</pre>

### Example Netplan:
<pre>
  # This is the network config written by 'subiquity'
network:
  ethernets:
    enp3s0:
      addresses:
        - 192.168.x.x/24
      nameservers:
        addresses: [x.x.x.x, x.x.x.x]
      routes:
      - to: default
        via: 192.168.x.x
  version: 2
</pre>

## Disable Wireless RF
- Prevents un-necessary access to the platform if connected via ethernet
<pre>
  sudo apt-get install network-manager
  sudo apt install rfkill

  #nmcli
  nmcli radio wifi
  sudo nmcli radio wifi off
  nmcli radio wifi

  #rfkill
  rfkill list
  sudo rfkill block bluetooth
  sudo rfkill block wlan
  rfkill list
</pre>

- Reboot
- Re-check wireless is still OFF.

# Time setup
- Critical to setup time sync early in the build
<pre>
timedatectl status
timedatectl timesync-status
timedatectl set-timezone UTC
timedatectl show-timesync --all

sudo nano /etc/systemd/timesyncd.conf
NTP=time.cloudflare.com uk.pool.ntp.org
#exit

systemctl restart systemd-timesyncd.service

timedatectl show-timesync --all
timedatectl status

# Ensure time is correct before moving onwards
</pre>

## Add legal warning login banner

<pre>
sudo nano /etc/issue.net


************************************************
* Unauthorised access or use of this equipment *
*   is prohibited and constitutes an offence   *
*     under the Computer Misuse Act 1990.      *
*    If you are not authorised to use this     *
*     system, terminate this session now.      *
************************************************

#exit
sudo nano /etc/ssh/sshd_config

# Update the following to include the path:
# no default banner path
Banner /etc/issue.net

#exit
sudo systemctl restart sshd.service

# log off via ssh
exit

# log in via ssh
</pre>
- Verify the new banner is there

## Install Lynis
- [Lynis](https://cisofy.com/lynis/)
<pre>
  sudo apt install lynis
  # Add basic Debian hardening packages
  sudo apt-get install libpam-tmpdir apt-listchanges fail2ban
</pre>

- Run lynis
<pre>
 # Example
 sudo /usr/sbin/lynis audit system >~/<YYYY-MM-DD>-lynis-audit.txt

 more ~/<YYYY-MM-DD>-lynis-audit.txt

</pre>
Disk setup
Ok this again proved to be slightly trickier than one first might imagine. On my previous instance I had a single storage 'disk' for the platform, I was now splitting into an OS disk and an index disk. This should be simply a case of using 'fdisk' and creating a new partition. However this is not inside the responsibility of a Splunk engagement and is up to the clients IT teams to undertake so it isn't something as consultants we do. After working with a colleague I found that the problem was that I was not creating a new partition on the 'splunk-indexes' disk and so it couldn't be correctly seen by the OS and wasn't available for the 'Splunkd' process to write to. Ok, fixed that by creating a proper partition.
# Incorrectly mounted:
- There is no partition on nvme1n1, it needs a partition and that can be mounted:

<pre>
lsblk -f

james@nuc13:/mnt/splunk-indexes$ lsblk -f
NAME        FSTYPE FSVER LABEL UUID                                 FSAVAIL FSUSE% MOUNTPOINTS
loop0                                                                     0   100% /snap/canonical-livepatch/246
loop1                                                                     0   100% /snap/core/16202
loop2                                                                     0   100% /snap/core20/1974
loop3                                                                     0   100% /snap/core20/2015
loop4                                                                     0   100% /snap/lxd/24322
loop5                                                                     0   100% /snap/snapd/19457
loop6                                                                     0   100% /snap/snapd/20290
nvme0n1
├─nvme0n1p1 vfat   FAT32       F6FB-9CC3                                 1G     1% /boot/efi
└─nvme0n1p2 ext4   1.0         87f212dc-bce6-4d43-9bbb-8d9f23a5af6b  289.7G    31% /
nvme1n1     ext4   1.0         8d5202b4-29be-4ffe-8683-4e87a830f572  869.2G     0% /mnt/splunk-indexes
</pre>


# Linux fdisk build example:

<pre>
sudo fdisk /dev/nvme0n1

n
# primary
F

# write
exit

sudo mkfs.ext4 -F /dev/nvme0n1p1

sudo mkdir -p /splunk-indexes
sudo mount /dev/nvme0n1p1 /splunk-indexes


Filesystem      Size  Used Avail Use% Mounted on
tmpfs           3.1G  2.0M  3.1G   1% /run
/dev/nvme1n1p2  457G  144G  290G  34% /
tmpfs            16G     0   16G   0% /dev/shm
tmpfs           5.0M     0  5.0M   0% /run/lock
/dev/nvme1n1p1  1.1G  6.1M  1.1G   1% /boot/efi
tmpfs           3.1G  4.0K  3.1G   1% /run/user/1000
/dev/nvme0n1    916G   28K  870G   1% /splunk-indexes


Disk /dev/nvme1n1: 931.51 GiB, 1000204886016 bytes, 1953525168 sectors
Disk model: CT1000P5PSSD8
Units: sectors of 1 * 512 = 512 bytes
Sector size (logical/physical): 512 bytes / 512 bytes
I/O size (minimum/optimal): 512 bytes / 512 bytes
Disklabel type: gpt
Disk identifier: 5CDDBFDD-BECA-7A47-AA42-263E2B420203


james@nuc13:~$ sudo mkfs.ext4 -F /dev/nvme1n1
mke2fs 1.46.5 (30-Dec-2021)
Found a gpt partition table in /dev/nvme1n1
Discarding device blocks: done
Creating filesystem with 244190646 4k blocks and 61054976 inodes
Filesystem UUID: 8d5202b4-29be-4ffe-8683-4e87a830f572
Superblock backups stored on blocks:
	32768, 98304, 163840, 229376, 294912, 819200, 884736, 1605632, 2654208,
	4096000, 7962624, 11239424, 20480000, 23887872, 71663616, 78675968,
	102400000, 214990848

Allocating group tables: done
Writing inode tables: done
Creating journal (262144 blocks): done
Writing superblocks and filesystem accounting information: done

/dev/nvme1n1 on /mnt/splunk-indexes type ext4 (rw,relatime)

</pre>
Splunk install
This is a blog topic in itself really, I'll stick to the high level which is setting THP, creating a systemd service, configuring ulimits and a splunk user, 'chowning' the /opt/splunk directory, migrating the splunk.secret file before first time run etc. It is quite involved to deploy Splunk correctly and reliably, there is some guidance on the Splunk docs page but it is worth having a professional admin check it fully if you're then going to clone that into production.
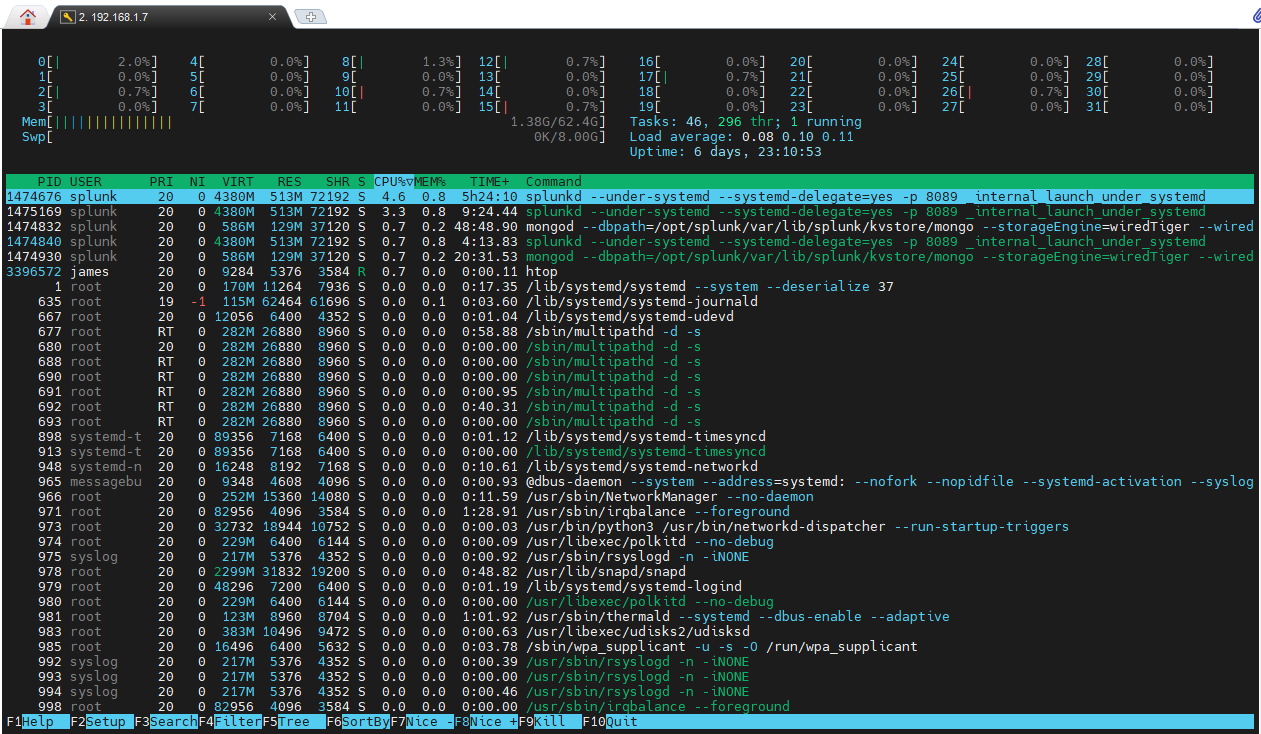
24 CPU cores
The output below shows 'htop' and the huge volume of physical cores now available to the platform, this is before the Splunk install and the arrival of the second stick of RAM. The CPU architecture on this processor type is novel and mixes performance and efficiency cores which will be interesting to test. It may be that Splunk performs poorly on the efficiency cores, but this is a lab and a great place to trial such things. Selecting an enterprise grade Xeon would negate this uncertainty but at a cost!
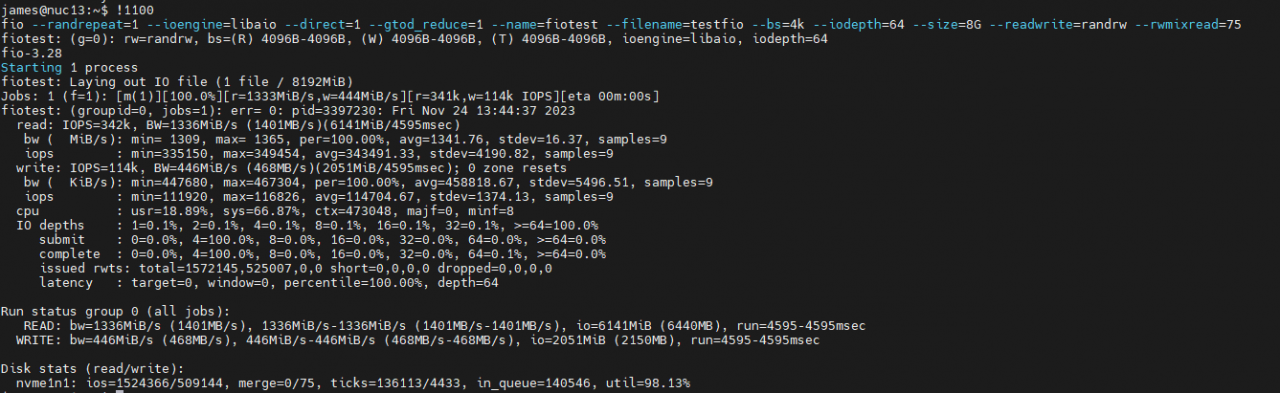
FIO / IOPS check:
To verify the IOPs or disk speed I installed 'fio' and ran an 8GB file write test, as you can see this resulted in 342k Read IOPS and 114k Write IOPS . To put it into perspective the Splunk recommended minimum is 800 IOPS this is therefore 143x faster Write speed that Or 465x faster Read speed.
<pre>
sudo apt-get install fio

fio --randrepeat=1 --ioengine=libaio --direct=1 --gtod_reduce=1 --name=fiotest --filename=testfio --bs=4k --iodepth=64 --size=8G --readwrite=randrw --rwmixread=75

# delete the test file after use
rm -rfv testfio
</pre>
Splunk Volumes
# Disk:
james@nuc13:/opt/splunk/etc/apps/ORG_indexer_volume_indexes/local$ df -kh | grep /dev
/dev/nvme1n1p2  457G   54G  380G  13% /
/dev/nvme1n1p1  1.1G  6.1M  1.1G   1% /boot/efi
/dev/nvme0n1p1  916G   97G  774G  12% /splunk-indexes

# Conf files:
indexes.conf

[volume:primary]
path = /splunk-indexes
# Note: The *only* reason to use a volume is to set a cumulative size-based
# limit across several indexes stored on the same partition. There are *not*
# time-based volume limits.
# ~5 TB
maxVolumeDataSizeMB = 930000


[firepower]
coldPath = volume:primary/firepower/colddb
enableDataIntegrityControl = 0
enableTsidxReduction = 0
homePath = volume:primary/firepower/db
maxTotalDataSizeMB = 512000
thawedPath = $SPLUNK_DB/firepower/thaweddb      # NOTE! this has to be $SPLUNKDB or it fails to start Splunkd
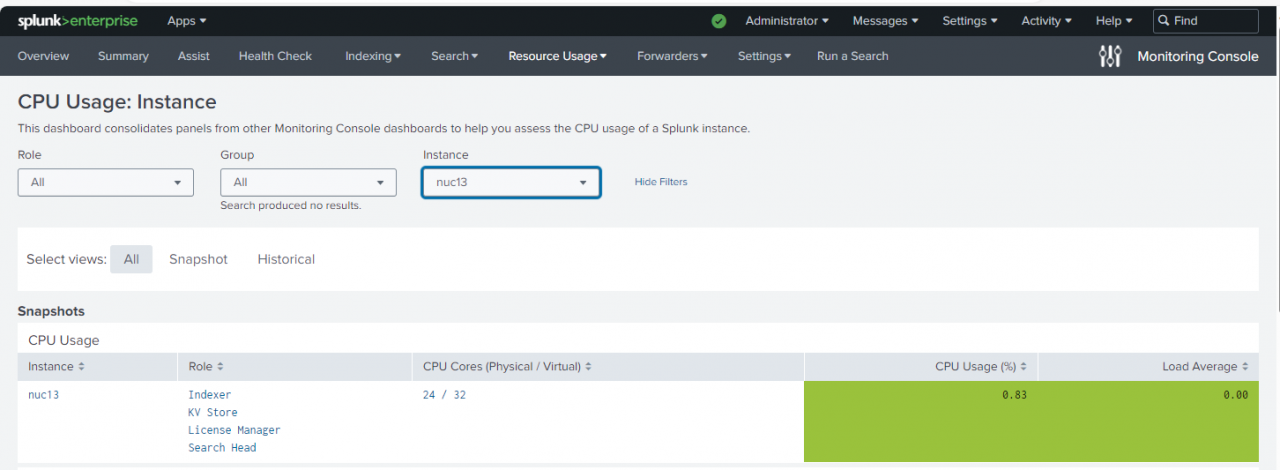
After that just Apps needed to be pulled down from Git Hub or migrated in. I'm very pleased with the performance thus far and as you can see from this MC snapshot, it is ready to go for Premium App installation. I'll follow up with another post about how that goes in the coming weeks.